|
|
|
S U P E R - D E L T A
Large, larger and even larger they become.

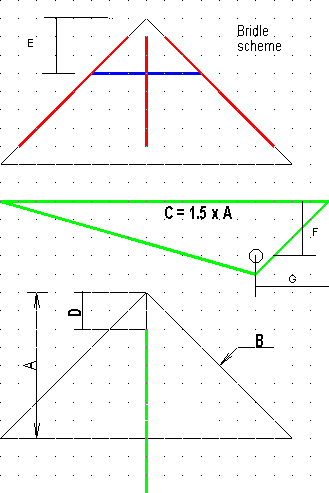
A delta kite is easy to make. On the right you see a diagram that shows the form how the kite can be made. How large the kite will be depends on the size of the materials. There are a few key-measurements that will determine the largest size for your kite.
They are :
- The length of your sticks.
- The width and length of your plastic.
These are the bases of my delta kites
A = 455 mm
B = 643 mm
C = 1.5 x A
D = 100 mm
E = 140 mm
F = 165 mm
G = 120 mm
Materials
Plastic, bags, ect.
Wooden sticks
Two wall plugs
Cellotape of about 40 mm width
Little piece of rope
Scissors
Most of the time sticks aren't a problem. If a stick is too short you can often make it longer by using a piece of hard PVC tube and connect both ends into it. Since the surface/weight ratio is far in advance of the surface you can use larger wooden sticks. Also the red colored sticks don't have to be the full length of the side. Use what you can find and just scale everything up or down to the sizes you have.
Example:
A = 455 mm
The largest size you can get out of a piece of plastic is 955 mm then used scale everything up with an factor of 955 / 455 = 2.1
This way i have build one with a wingspan of 3 meter.
A full delta wing can be made up out of multiple smaller delta's. I used two large garbage bags for it. I cut them to pieces and glue the triangles together with cellotape. Use tape of about 4 cm width to glue the two pieces together. Tape the center stick in position but only tape this stick near the top and bottom. Now spread the kite on the ground and place the two stick on the sides of your kite. Now you must determine the location of the blue stick. This will be at 'E'. Mark this position on the side sticks and center stick. Make a little loop from a string of wire. About 3 cm and place this loop at position 'E' on the center stick. Now you can tape the center stick completely
Now take the wall plugs. These plugs are use for hanging things on stone walls. You drill a hole in the wall, place the plastic plug in the hole and drive the screw in the plug. [i don't know the word for it but i think you understand what kind of plug i mean.]. You can split this plug in half using a sharp knife. Make sure that you don't split the plug totally. Now bend one leg about 45 degrees and the other about 135 degrees in opposite direction. Tape the plug at the location of the mark to your side stick. These plugs will later hold the (blue) spreading stick in place.
Next you can tape the side stick to kite. Measure the span between the two plugs and cut the (blue) spreader stick at the right length. The keel is draw in green. Just make this from pieces of plastic that are left over. I make the keel always from two pieces of plastic taped together. Tape the keel on top of the kite, again with cellotape
Assembly
Lay the kite keel down on the ground. Put the spreader stick through the loop made of wire and into the plugs. Attach a kite line to the keel. This kite doesn't need a tail but you can add one or more to it.
Copyright © 1998, A.A. van Zoelen.
All rights reserved.
Updated: 18 September 1998